
The Obojobo Repository is the main interface for authors to create, edit, and manage Learning Objects. The Repository also provides information about students’ performance in the Assessment section of your Learning Object(s). Through the Repository, Obojobo users with authoring privileges have the ability to share their Learning Objects with colleagues via the Public Library as well as access Learning Objects created and shared by the Obojobo community.
Logging-In & Inactivity
To log-in, UCF faculty and staff should use their NID as their user-name. If you do not know your NID, you may log into myUCF to find out what your NID is. If you are not a UCF faculty or staff, your user-name will be assigned and emailed to you after proper credentials and affiliation to UCF are confirmed.
Please note that the Obojobo Repository is set to disconnect after 20 minutes of inactivity. If you leave the Repository open in a browser window and return to the Repository after it has disconnected, you will be notified to log-in again. However, any information you were working on will not be lost.
Interface
The Repository interface is composed of four main areas (My Objects, My Instances, Media Assets, and Public Library) as shown below:
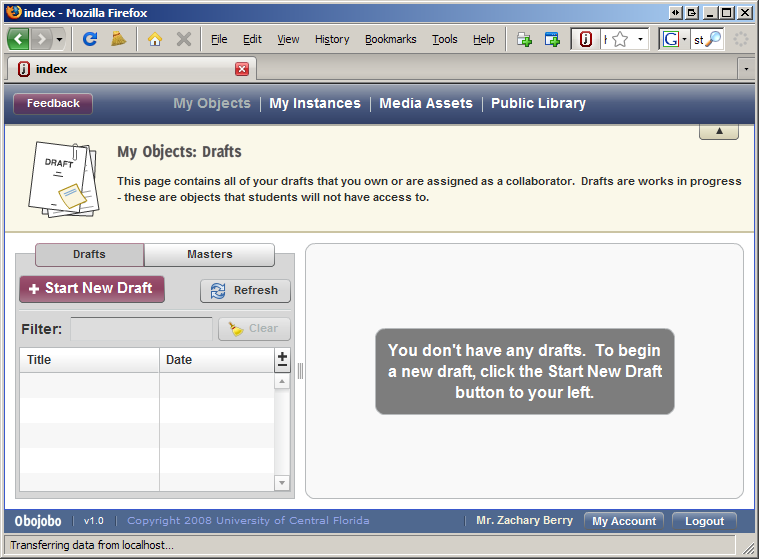
At the top, you have the four primary sections of the Repository including: 1) My Objects, My Instances, Media Assets, and Public Library. You also have the Feedback button (left), which you can use at any time to provide your thoughts, suggestions, or file bug reports to the Obojobo development team.

Second, you will find the help section which explains what the feature or setting is. You may click on the ‘Up-arrow’ button to hide the help section.
Third, you will find the main work area where you edit and manage your Drafts Objects, Instances, and Media Assets. The interface in this area will differ depending on the section you choose to work on.
At the bottom of the Repository interface, you will find information and a menu to manage your Obojobo account. That is, you will see your user name, then the ‘My Account’ button which will open up a window to change your personal info, password, and an option to set preferences. Last is the ‘Log-out’ button which will log you out of the Repository.

Continue reading for more details about each area of the Repository interface.
Main Sections
The Repository is split up into four primary sections:
- My Objects
- My Instances
- Media Assets
- Public Library
My Objects
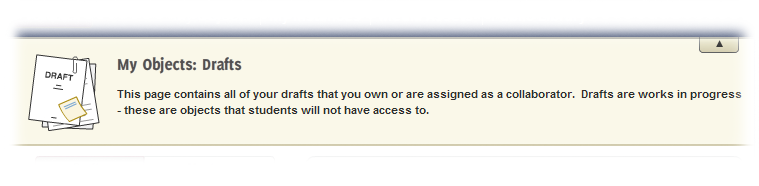
This section houses all of your Learning Objects. This includes any Draft Objects you have created, any Master Objects you have created, any Learning Objects that others have defined you as a collaborator, or any Learning Objects you have copied from the Public Library. To better understand the difference between Drafts Objects and Master Objects, please refer to the Drafts, Masters and Instances guide.
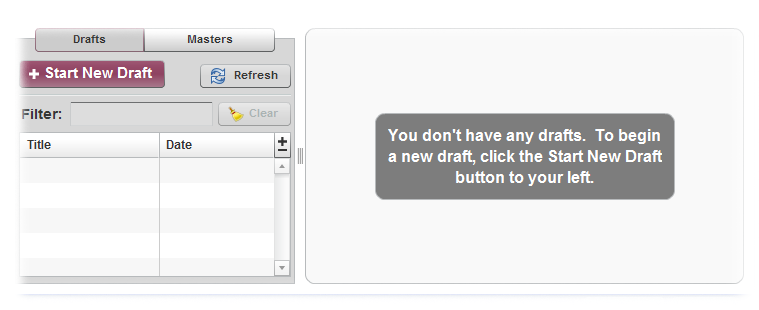
‘My Objects’ is the section you will see as soon as you log into the Repository. The ‘My Objects’ section is split into two sub-sections: 1) Drafts and 2) Masters. Click on the corresponding tab to change between viewing your Draft Objects or Master Objects.
The ‘Refresh’ button will update the corresponding listing.
Drafts Tab
When you click on a Draft Object from the list on the left side of the screen, you will see details about the Draft Object on the right panel.The purple bar at the top is the Action Bar which provides the following actions applicable to the selected Draft Object:
- Preview: Opens your Draft Object in preview mode which allows you to see and experience what your students will encounter when they access your Learning Object. Although this view is very similar to what the student will see, there are a couple of key differences:
Note:In the Assessment quiz, you will be able to see your answers immediately. This is not the case for your students as they will not receive their score until they have completed and submitted the Assessment. In addition, if your Learning Object contains any Media Assets, information pertaining to the available space and the size of the Media is shown in the upper-left corner of every media piece.
- Continue Editing: opens your Learning Object in the Learning Object Editor. The Editor will open in a new tab or window. When you are done editing your object, you can close the tab or window to return to the Repository.
- Permissions: opens up the Permissions window. Under the ‘Collaborators’ tab you can add and remove collaborators to your object. Note that you can only add or remove collaborators if you are an owner of the Draft Object. Also, in the Ownership tab, you may remove yourself from a Learning Object as long as another owner exists.
- Delete: deletes your Learning Object. Please know that deleting will remove your Draft Object completely, and cannot be undone. Clicking on ‘Delete’ will prompt you to make sure you want to delete a Draft Object.
- Below the actions bar, you have the ‘Details’ area which includes:
- Permissions & Ownership which lists everyone (including you) who has ownership to this Draft Object. You can click on ‘Permissions’ in the actions bar to modify permissions.
- Draft Name and Version: use to identify the selected Draft Object.
- Object Details: displays information about your Learning Object to help you identify it.
Masters Tab
As the name indicates, the ‘Masters’ tab lists all of your Master Objects. When you click on a Master Object from the list on the left, you will see details about the Learning Object on the right panel.
Masters Tab Actions:
- Preview: allows you to preview your Master Object in the student view, similar to previewing Drafts Objects.
- Edit as New Draft: begins a new Draft Object based on the Master Object you have selected.
- Publish Instance: creates an Instance of your Master Object for each course. This feature is important as each Instance will contain its own scores (just like each course contains its own student roster). For more information on Instances, please refer to the Drafts, Masters and Instances guide.
- Permissions:opens up the Permissions window. Under the ‘Collaborators’ tab you can add and remove collaborators to your object.
Note: You can only add or remove collaborators if you are an owner of the Draft Object. Also, in the ‘Ownership’ tab, you may remove yourself from an Learning Object as long as another owner exists.
- Share: makes your selected Master Object available in the Obojobo Public Library so other users will be able to publish Instances from your Master Object. The Master Object will remain under your control.
- Delete: deletes your Learning Object. Please know that deleting will remove your Master Object completely, and cannot be undone. Clicking on ‘Delete’ will prompt you to make sure you want to delete the Master Object.
Below the actions bar, you have the ‘Details’ area which includes:
- Permissions & Ownership: which lists everyone (including you) who has ownership to the Master Object. You can click on ‘Permissions’ in the actions bar to modify permissions.
- Object Details: which displays information about your Learning Object to help you identify it.
My Instances
This section houses all Instances you have created, either from your Master Objects or from Master Objects in the Public Library.
Instance Details Tab
Actions:
- Preview: allows you to preview your Master Object in the student view, similar to previewing drafts.
- Edit Details: allows you to edit the Instance details instead of defining them for the first time.
- Delete: deletes your Instance. Please know that deleting will remove your Instance completely, and cannot be undone. Clicking on ‘Delete’ will prompt you to make sure you want to delete the Instance.
Instance Details:
- Link: provides you the URL (link) you need to give your students so that they can access your Instance. Click on ‘Copy to Clipboard’ and paste the link in the document (course web page, syllabus page, etc.) you will provide to your students.
- Instance Details: displays information about your Instance to help you identify it.
Assessment Scores
Actions:
- Download Scores: allows to download the scores of your Instances in a CSV file so that you may import the scores into other applications such as Microsoft Excel.
Instance Details:
- Scores Section: provides scores and basic statistical data including maximum, minimum, mean and standard deviation.
- Frequency Distribution Chart: provides a visual representation of how scores are distributed.
Media Assets
This section houses any Media Assets you have uploaded.
Actions:
- Edit Media Details: allows you to edit details about the Media Assets you uploaded such as the title, description, copyright.
- Delete: as the name indicates, this action allows you to delete the selected Media Assets you uploaded.
Page Details:
- Media Details: displays information about the Media Assets you uploaded to help you identify it.
- Preview: allows to view Media Assets to ensure you incorporate the right media into your Learning Objects.
Public Library
This page is the public repository of Learning Objects contributed by the Obojobo community.
Actions:
- Preview: opens your Learning Object in preview mode which allows you to see and experience what your students will encounter.
- Publish Instances: creates an Instance of the shared Learning Object for each course. This feature is important as each Instance will contain its own scores (just like each course contains its own student roster). For more information on Instances, please refer to the Drafts, Masters and Instances guide.
- Create Derivative Work: creates a copy of the Master Object which you may edit. This option is only available if the user who contributed the Learning Object allows the Obojobo community to edit the Learning Object through enabling theis feature.
- Remove From Library: removes your shared Learning Object from the Public Library. Once the Learning Object is removed, Obojobo users will not be able to create new Instances from your Learning Object; however, any Instances created before you removed the Learning Object will not be removed.
Note:Object Details which displays information about the shared Learning Object to help you identify it.
My Account Window
You may use this window by clicking on ‘My Account’ at the bottom-right. This window contains the following:
- Personal Info
- Change Password
- Preferences
Publish Instance Window
You may use this window by clicking on ‘Publish Instance’ (under Masters in ‘My Objects’ or in the ‘Public Library’)This window will guide you through the process of creating a new Instance. It requires the following information:
- Instance Name: This is the name of the Instance, which is what students will see when they view your Instance. When you create an Instance, by default this field will be the same title as the Learning Object name.
- Course: The course field is for you to be able to tag the course for which this Instance will be deployed. It is recommended that you follow the format of ‘Prefix Number Section’, for example ‘ENC 1101 08FallW59’ – the same format as Webcourses for UCF. Future versions of Obojobo will be able to automatically populate this field with a listing of your current courses.
- Start Date: This is the date when the Instance will be opened to students. A student will not be able to access the instance before this date.
- Start Time: Students will not be able to access this Instance prior to the start time.
- End Date: This is the date when the Instance will be closed to students. Students will be able to access the content and practice sections of the Instance after this date. However, students will not be able to access the assessment section.
- End Time: Likewise, students will not be able to access the Assessment of this Instance after this time.
- Assessment Attempts: This is the number of tries a student may take the Assessment. Currently, the highest score received will be the score that is reported. When viewing the Instance, students will see the number of Assessment attempts they have before they begin taking the Assessment.
Instance Window
This window is displayed by clicking on ‘Edit Instance’ (under ‘My Instances’).This window is similar to the ‘Publish Instance’ window – the only difference is that you will be editing the Instance details instead of defining them for the first time.
Permissions Window
This window is displayed by clicking on ‘Permissions’ after selecting a Master Object under ‘My Objects’.
Submit Feedback/Bug Report Window
You may use this window by clicking on ‘Feedback’.This window allows you to submit the following
- Feedback: Select this to provide any thoughts, ideas, complaints, or any feedback whatsoever.
- Bug Report: If you encounter a bug select this option to file a bug report.
- Feature Request: If you have an idea for a feature you would like to see in Obojobo, select this option.
Upload Media Asset Window
This window is displayed by clicking on ‘Upload Media’ under ‘Media Assets’.Complete information on this window (as well as media guidelines) can be found in Media Assets on the Repository page.
Edit Media Asset Window
This window is displayed by clicking on ‘Edit Media Details’ for a selected Media Asset. Complete information on this window (as well as Media Assets guidelines) can be found in the Media Assets tab of the Repository guide.
This window is used by clicking on ‘Share’ for a selected Master Object under ‘My Objects’.
Remove from Library Window
This window opens by clicking on ‘Remove From Library’ for a selected object in the ‘Public Library’.